
Google Analytics 4 (GA4) is a powerful web analytics service that allows you to track and understand how users interact with your website or mobile app. Unlike its predecessor, Universal Analytics, GA4 operates on an event-based data model. This means that every user interaction, from a page view to a purchase, is considered an “event.”
While GA4 automatically collects a range of predefined events (like page_view, first_visit, and session_start), it also gives you the flexibility to create custom events. These custom events are crucial for businesses because they allow you to track specific actions that are unique and highly relevant to your individual business goals
In this guide, you’ll learn:
- What custom events in GA4
- Why and when to use them
- How to create and implement custom events
- Best practices to follow
What are Custom Events in GA4
In Google Analytics 4 (GA4), the core of data collection revolves around “events” – essentially, every interaction a user has with your website or app. While GA4 is smart enough to automatically track some common events, it can’t anticipate every unique action that’s important to your business.
This is where custom events become invaluable. They are precisely what their name suggests: interactions that you, the user, define and set up to track. GA4 doesn’t track these out-of-the-box because they are specific to your website’s functionality or your business objectives.
Imagine you have a unique button on your website that, when clicked, allows users to “Request a Free Consultation.” GA4 won’t automatically know what this button is or how important it is to your sales funnel. By creating a custom event, you can tell GA4: “Hey, whenever someone clicks *this specific button*, record it as a ‘consultation_request’ event.”
Examples of Custom Events
Here are some common examples of what you’d typically track with custom events, as GA4 wouldn’t automatically categorize these as significant actions for *your* business without your input:
- Clicking a specific Call-to-Action (CTA) button: This could be a “Download Whitepaper” button, an “Add to Wishlist” button, or any other button that signifies a user’s interest in a particular offering.
- Watching 75% of a product demo video: While GA4 might track video engagement, you might want a more granular understanding of how much of a *specific* video users are watching, indicating a deeper level of interest.
- Submitting a lead form: This is often a critical conversion point. You’d want to track exactly how many users successfully complete and submit a “Contact Us” or “Sign Up for Newsletter” form.
- Downloading an eBook: If you offer downloadable content, tracking these downloads as custom events helps you understand the popularity of your content and its role in lead generation.
Essentially, custom events act as flexible, tailor-made trackers for any user interaction that GA4 doesn’t automatically measure but is vital for you to understand your audience and optimize your business outcomes. They empower you to capture data that directly aligns with your unique marketing and business strategies
When Should You Use Custom Events?
- The interaction is not part of GA4’s enhanced measurement
- You need to track micro-conversions specific to your funnel
- You want custom dimensions or parameters to go with the event
- You’re optimizing for Google Ads or remarketing
Once you’ve decided which unique user interactions you want to track, the next step is to implement them. Here I am explaining two main methods for setting up custom events in GA4, each catering to different technical comfort levels and workflows:
Creation of Custom Events using Google Tag Manager (GTM)
1. Navigate to Your GTM Dashboard:
Log in to your Google Tag Manager account and select the appropriate container for your website.
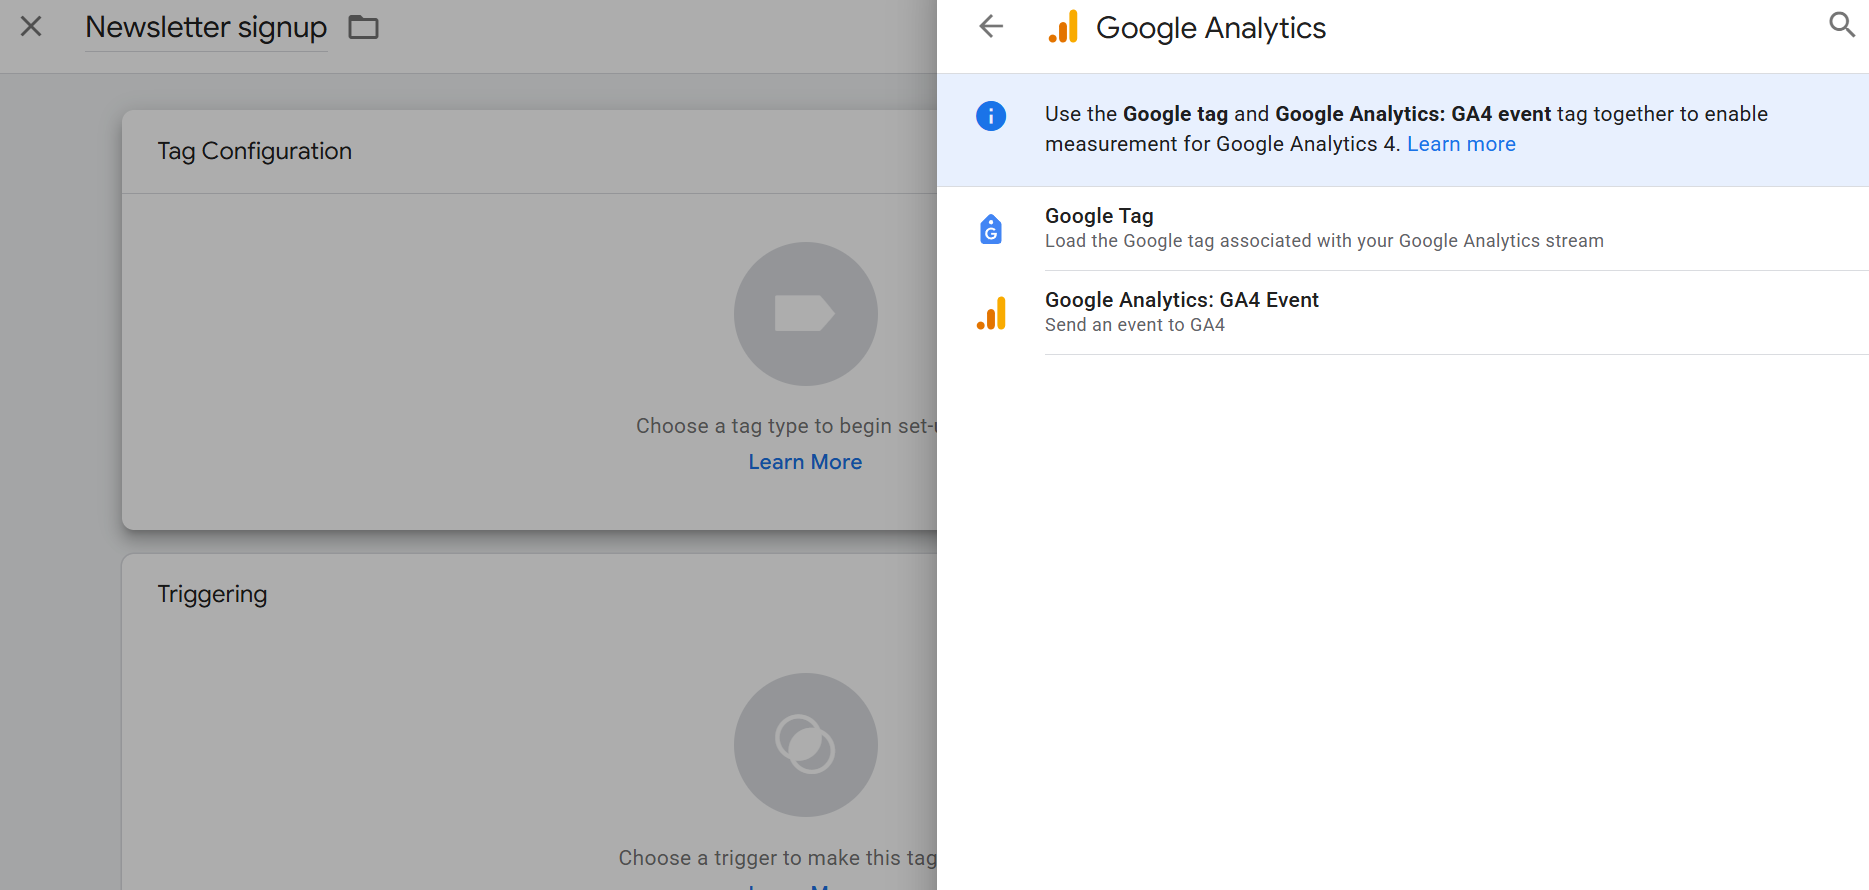
2. Create a New Tag:
- From the left-hand menu, click on Tags.
- Then, click the “New” button to start creating a new tag.
3. Configure Your GA4 Event Tag:
- Click on “Tag Configuration.”
- From the “Choose Tag Type” list, select “Google Analytics: GA4 Event.”
- Choose Your Existing GA4 Configuration Tag: This links your new custom event to your primary GA4 property. (e.g., GA4 Configuration – [Your Measurement ID]).
- Define Your Event Name:In the “Event Name” field, type a descriptive name for your custom event (e.g., form_submit, video_progress_75_percent, ebook_download).
4. Add Event Parameters (Optional but Recommended):
Parameters provide additional context about the event, making your data much richer.
- Under “Event Parameters,” click “Add Row.”
- Enter a “Parameter Name” (e.g., form_id, video_title, ebook_name).
- Enter a corresponding “Value” for that parameter. This could be a static value (e.g., contact_us_form) or a GTM variable (e.g., {{Page Path}} to capture the URL where the event occurred, or a custom variable for a specific video title).
5. Set Your Triggering Condition: This tells GTM when to fire your custom event.
- Scroll down to the “Triggering” section and click.
- Choose an existing trigger or create a new one that accurately represents the user action you want to track (e.g., a “Form Submission” trigger, a “Click” trigger configured for a specific button ID or class, or a “Scroll Depth” trigger).
Creation of Custom Events Directly in the GA4 Interface
This option is perfect for creating new, derived events within GA4 itself, without needing to touch your website’s code or GTM. It’s particularly useful for defining a “conversion” from an existing event or refining the definition of an event already being collected.
Step-by-Step Guide in GA4:
1. Access the Events Section:
- Log in to your Google Analytics 4 account.
- Navigate to “Admin” (gear icon in the bottom left).
- Under “Data display,” click on “Events.”
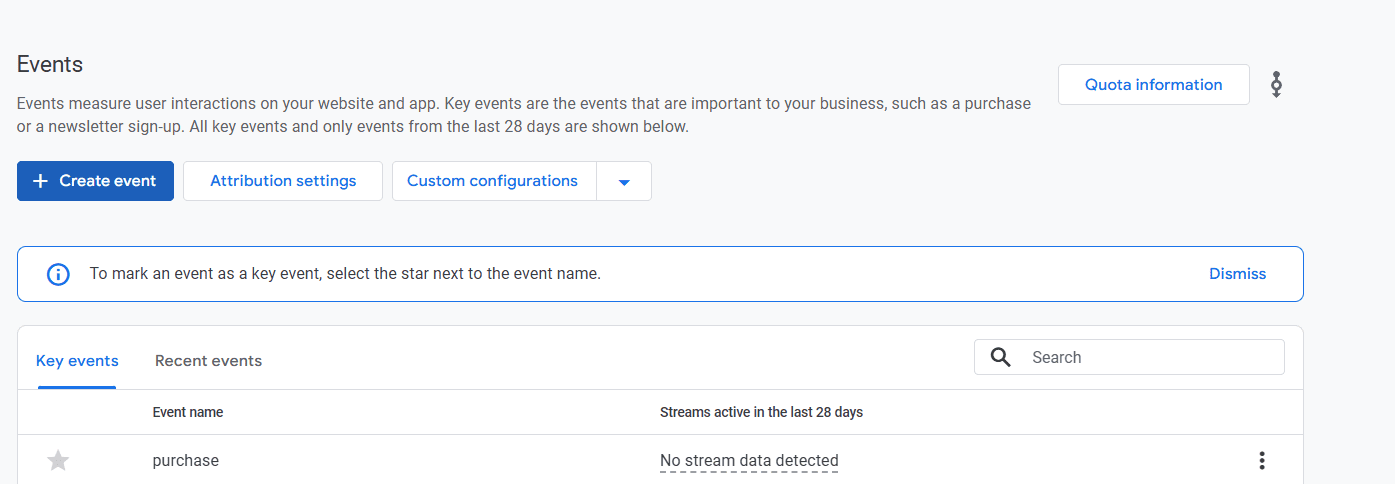
2. Create a New Event:
- On the “Events” page, click the “+ Create event” button.
- Then, click the “Create” button within the “Create a custom event” window.
3. Define Your Custom Event:
- Custom event name: Enter the desired name for your new custom event (e.g., `thank_you_page_view`, `large_order`). Remember GA4 naming conventions (lowercase, underscores).
- Matching conditions: This is where you specify which existing event(s) will trigger your new custom event. You’ll set up conditions based on the `event_name` and any relevant parameters from the source event.
- Click “Add condition.”
For `event_name`, set the operator to `equals` and the value to the existing event you’re basing it on (e.g., `page_view`).
Add another condition for a parameter if needed. For example, to track a specific “Thank You” page:
Parameter: `page_location`
Operator: `contains` or `equals`
Value: `/thank-you` (or the specific path of your thank you page).
4. Copy Parameters (Optional):
By default, “Copy parameters from the source event” is enabled. This is usually a good idea as it transfers all relevant data from the original event (like `page_location`, `page_title` from a `page_view` event) to your new custom event.
5. Modify Parameters (Optional):
You can also modify or add new parameters to your custom event. This is useful if you want to explicitly add a new parameter or change an existing one’s value based on a condition. Click “Add modification.”
Parameter: (e.g., `form_type`)
New Value: (e.g., `contact_us`)
6. Create the Event: Click the “Create” button in the top right.
Difference Between Key Events and Custom Events
In simple terms, custom events are any specific actions you choose to track on your website or app, like someone clicking a “Download” button or watching a video. A key event, however, is simply one of these custom events that you’ve decided is especially important for your business goals, such as a “Purchase Completed” or a “Newsletter Signup.” So, while you might track many custom events in GA4 to understand user behavior, you only mark the most critical ones as key events, allowing you to quickly focus on and measure progress towards your most important objectives.
Pro Tip for All Implementations:
Always Test Before Going Live- Before publishing your custom events to your live website or relying on them in reports, rigorously test them to ensure they are firing correctly and sending the expected data to GA4.
- Google Tag Manager Preview Mode: (For GTM implementations) Use GTM’s built-in Preview Mode to see which tags are firing (or not firing) on your site as you browse.
- GA4 DebugView: In your GA4 property, navigate to “Admin” \> “DebugView.” This real-time report allows you to see the events streaming in from your device (when in debug mode), complete with their parameters, helping you verify your setup. Look for your custom event name and ensure all expected parameters are present with the correct values.